
TSM Studio (59)
Changing the Date on a TSM Server
If you change the date on the underlying Operating System that your TSM Server is running on you will need to run the ACCEPT DATE command. If TSM is up when the date change occurs then you can login to the TSM Server using the Admin CLI or TSM Studio ( example at the end of this article) and run the ACCEPT DATE command.
If your server was down and your windows TSM Server service will not start. Check the event log or console messages for the following error
TSM Server Error: Server: SERVER_NAME ANR0110E An unexpected system date has been detected; the server is disabled. Verify the system date and use the ACCEPT DATE command to establish the current date as valid.
If you are unable to access the server from the ADMIN CLI then go to the command prompt or unix shell, change to the directory where dsmserv.exe (just dsmserv on unix) is installed and run it. When you see the above message enter ACCEPT DATE and once the new date has been accepted run the HALT command to stop TSM and start the TSM Server in the normal way for that Operating System.
Why do you need to do this
If someone has accidentally changed the Operating System date to a future date and the expiration process runs then a lot of data could be lost.
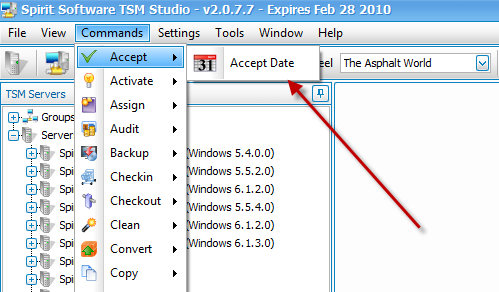
If you can access the TSM Server from TSM Studio then goto to the COMMANDS menu and select ACCEPT DATE
Setting up Client Node Statistics Dataviews in TSM Studio
The Node (Backup, Restore, Archive and Retrieve ) Statistics dataviews in TSM Studio source their data from the TSM Server Activity Log.
The format of the numbers in the Activity Log is dependent on the regional and TSM Client settings on the Client Node so it is possible that there may a number of different number formats stored in the Activity Log. This does cause issues for TSM Studio when trying to determine which number system is being used and converting to numbers. To address this issue TSM Studio 2.9.3.5 has added configuration options to set defaults and overrides for the different number systems.
Firstly the default setting which all be used for all Client Nodes data can be set using the Settings–>Client Node Statistics Settings–>Client Node Statistics Defaults as shown here

In the settings dialog specify the default values used for the decimal point and thousands separator.
Use the Client Node Statistics Overrides to change this setting for individual Client Nodes

The file TSM Studio.scfg already exists error
If the following error message is seen when starting TSM Studio
The file ‘……\AppData\Roaming\Spirit Software Solutions\TSM Studio\TSM Studio.scfg’ already exists
Error 100 (Provider v5.0.3.1237): Cannot create data storage or file: ……\AppData\Roaming\Spirit Software Solutions\TSM Studio\TSM Studio.scfg
Error 113 (Provider v5.0.3.1237): Cannot create database: ……\AppData\Roaming\Spirit Software Solutions\TSM Studio\TSM Studio.scfg
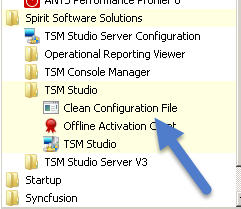
This indicates there is a problem with the TSM Studio configuration file
Try cleaning the configuration file using the Clean Config File Utility
If the Clean Config File utility indicates there is an issue with the configuration file then there are a number of options
- Restore the configuration file from a previous backup
- Delete the Configuration File, TSM Studio will recreate it but you have to re-enter the TSM Server definitions and license key
- Send the Configuration File to support@spiritsoftware.biz and we will attempt to recover it
Restoring a Client Node from Another Client Node
It is possible to impersonate a client node on a different node and there are 2 ways to do this.
The first option is to just change the nodename to match the impersonated name, this requires that you know the password of the nodename to be impersonated.
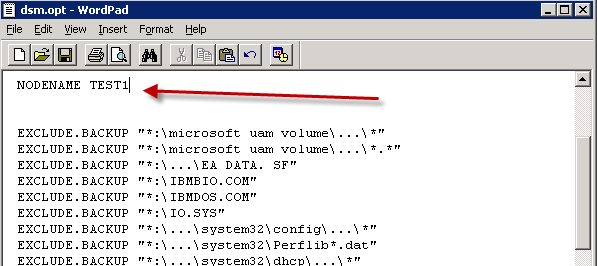
Either change the nodename in the dsm.opt file to the nodename to be impersonated
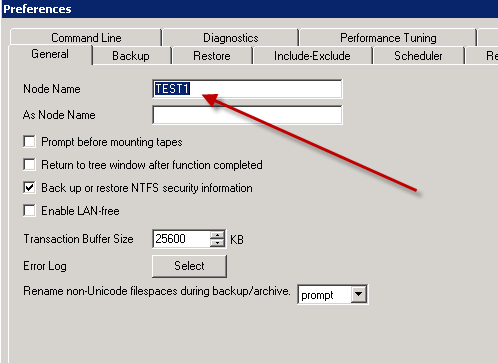
or change the nodename in the Backup-Archive Client by going into the preferences
and Changing the Node Name
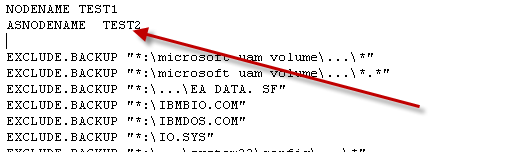
Alternatively you can use the ASNodeName option. This requires specifying the ASNodeName option either in the dsm.opt file or using the Backup-Archive client and also granting access on the TSM Server to impersonate this Node Name.
Either modify the dsm.opt file as follows
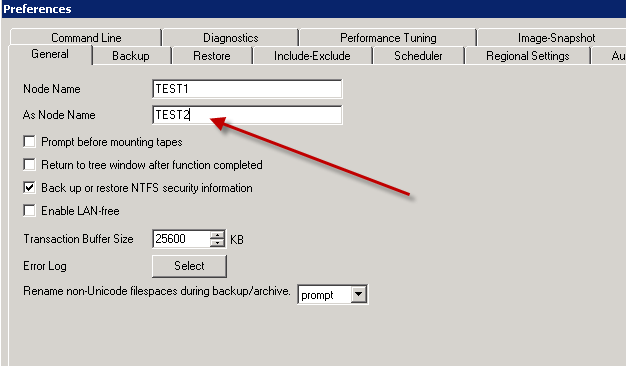
or go into the preferences dialog as above and change the As Node Name field
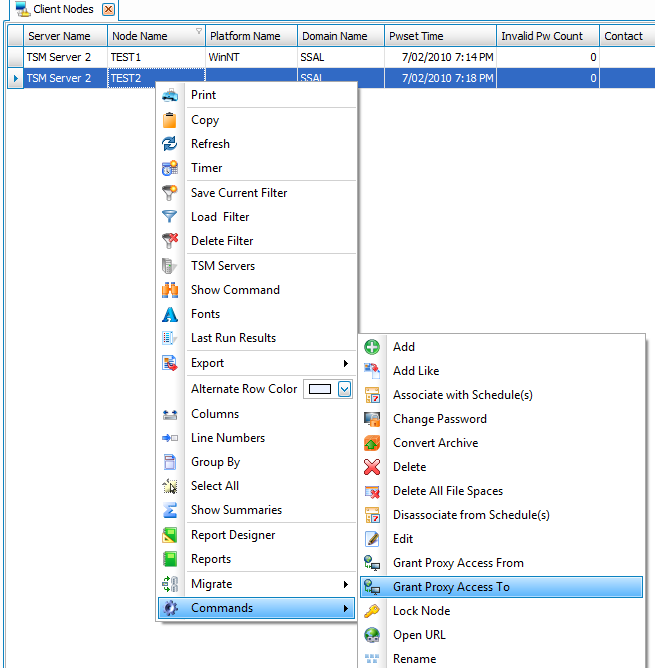
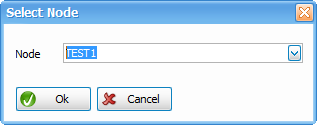
Now grant the Node Test1 access to impersonate Test2 on the TSM Server.
Open the Client Nodes dataview in the Configuration category in TSM Studio and choose the node that is to be impersonated. Right click to bring up the Commands context menu and choose Grant Proxy Access to and select the Node that will impersonate this node
MHVTL and TSM Studio
To use TSM Studio to help configure libraries and drives presented from MHVTL to a windows TSM Server see this video by K. Gundurao
http://kgundurao.blogspot.in/2014/02/mhvtl-configuration-in-tsm-with-help-of.html
TSM Studio Server (3)
Microsoft SQL Server settings for TSM Studio Server
If SQL Server is running on the same Server as the TSM Studio Server service then we recommend 12GB of memory as a minimum to ensure the healthy running on TSM Studio Server.
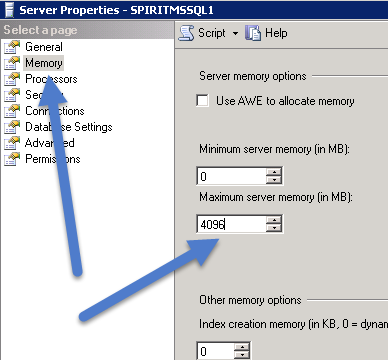
By default SQL Server will be configured to use all available memory this will need to be changed so that there is enough free memory for TSM Studio Server to function. It is recommended that SQL Server be given 4GB of memory and the other 8GB is left available for TSM Studio Server.
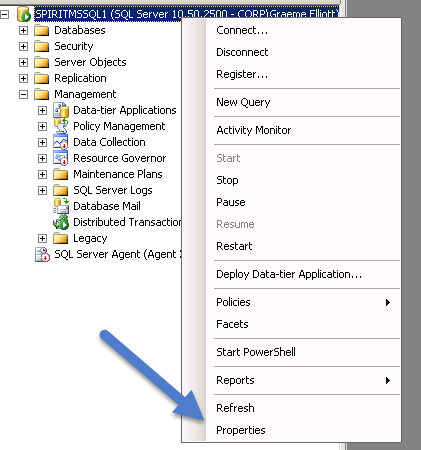
To change the default memory settings in SQL Server. Start up SQL Server Management Server right click on the server and select properties
Select Memory and then enter 4096 into the Maximum server memory field
Performance Tuning TSM Studio Server
In TSM Studio Server 2.9.011 and above there are a number of added enhancements to help tune TSM Studio for you environment.
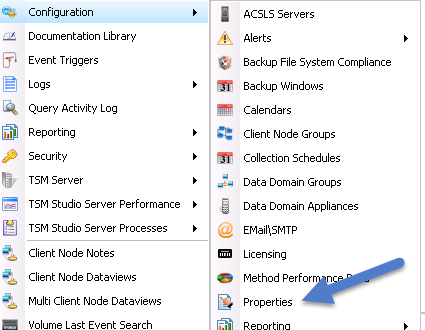
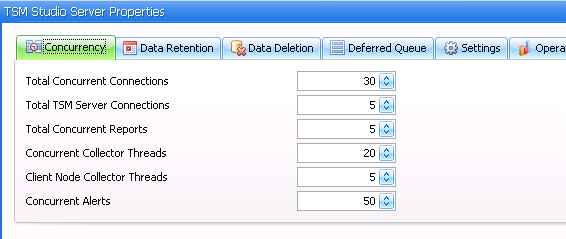
The first area to check is on the Concurrency Tab of the TSM Studio Server properties dialog which can be accessed from Configuration–>Properties as shown here
The main setting to check here are Concurrent Reports and Concurrent Collector Threads. Report creation can consume large amount of memory so it is recommended to keep this number low.
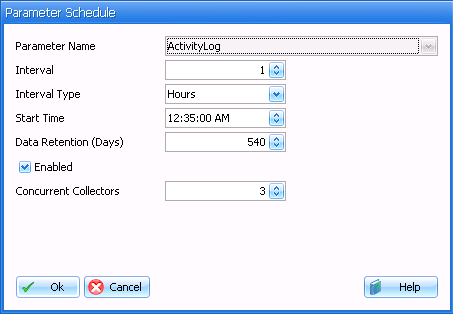
Also some of the collections can consume a large amount of transaction log space especially the activity log collector. Each collector can be individually tuned. Goto Configuration->Collection schedules and edit the Activity Log collector and change the Concurrent Collectors to a small number (less than 5 )
Also check out the below link for SQL Server memory settings
https://www.spiritsoftware.biz/knowledgebase/microsoft-sql-…-studio-server
TSM Studio Server Security
As of TSM Studio Server version 2.9.1.0 security has been tightened up and no longer stores any security information in the registry.
The default logon to TSM Studio Server is now admin with a default password of password, (Domain field should be blank otherwise TSM Studio Server will assume it is a windows userid).
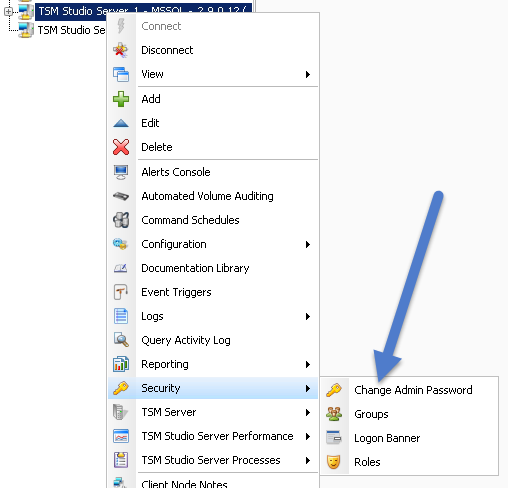
We strongly advise changing the admin password using the following procedure.
To change the password for the inbuilt admin userid use the Security–>Change Admin Password
Security in TSM Studio Server is now defined by assigning role(s) and Windows groups to a TSM Studio Server security group.
The TSM Studio Server security system will automatically create a group named Admins that has access to all functions in TSM Studio Server, the first time it is loaded it will look for the old group definitions in the registry and load them into this group otherwise it will populate with following default groups Administrators, Domains Admins and TSMStudioAdmins.
Also two roles will be created, one called Administrators which is assigned to the Admins Server group and one called Operational Report Viewer for allowing access to the Operational Report Viewer.
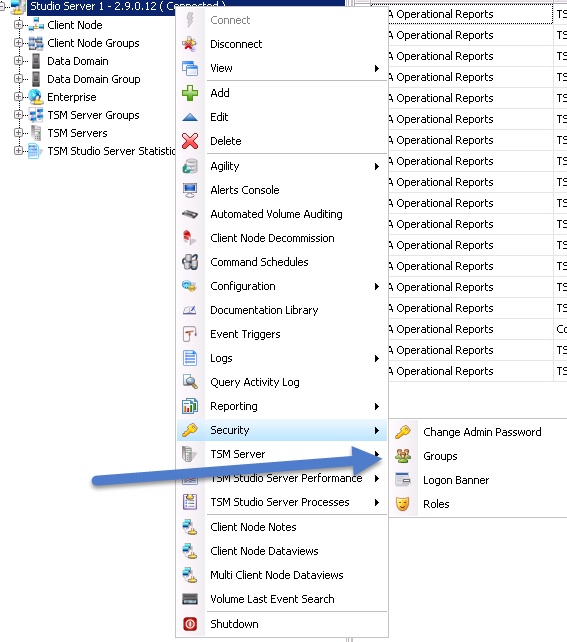
To access TSM Studio Server Groups select Security–>Groups
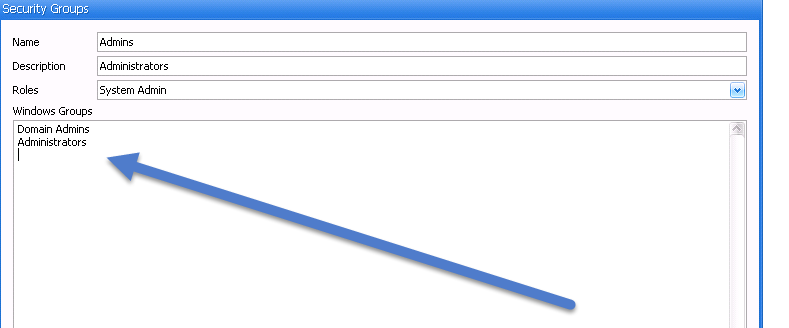
To modify the Admins Group Double Click or select edit from the Toolbar

Add Windows Group that should have admin access to TSM Studio Server, One Group per line
Dataviews (10)
Alternate Row Colors
Alternate Row BackColor Example

Using the Alternate Row Color feature can make the data easier to read. After opening a dataview right click to bring up the dataview context menu and select the Alternate Row BackColor option or select it from the Toolbar and the color you wish to use
Customizing the Columns

The columns in a Dataview can be customized in a number of ways,
- Columns can be moved
- Columns can be hidden
- Column Display Text can be changed
- The alignment can be changed
- The format of the data can be changed
To modify the columns right click on the dataview to display the dataview context menu and select columns ( or choose columns from the menu bar ). A dialog will be displayed showing a list of all the available columns and their settings.
Use the up and down arrow keys on the menu to change the order the columns are displayed.
To Hide a field click on the Hidden field for the column to hide.
To Change the Display text for a field click over the text in the Column Display Text field.
Use the Alignment Column to select the alignment for that column.
The Format field is used to the control how the column displays its data for example.
N0 defines a number field with no decimal points.
N2 defines a number field with 2 decimal points.
G defines a date field and shows just the date.
g defines a date field and shows the date and time
These are standard dotnet formats. If you want to have the data displayed in a different way let us know and we will help you format the data the way you want to see it.
Displaying Line Numbers
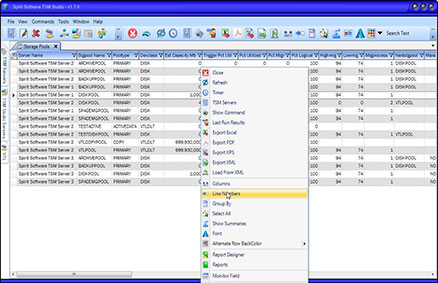
This will display Line Numbers as shown below
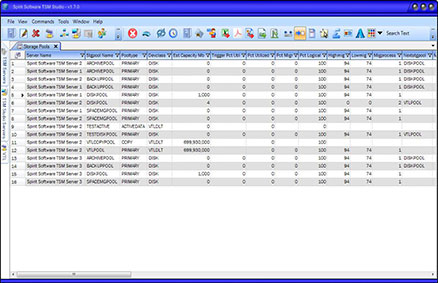
Sometimes it is handy to be able to the see line numbers in a dataview.
Right click on the Dataview and select the Line Numbers option from the Dataview context menu ( or from the Main Menu Bar ) to disable/ enable line numbers.
To Enable Line Numbers click on the Line Numbers option from the Dataview Context Menu.
Exporting the Data

From time to time you may wish to export the data from a dataview. TSM Studio provides a number of formats that you can use to export to Excel, PDF, XPS and XML. .
Right click on the Dataview to display the context menu for that Dataview and select from the available Export Options, then choose the ourput file name.
Data exported to XML can be reloaded later using the Load from XML option on the Dataview context menu, this allows you to work offline if you wish.
Filtering the Data
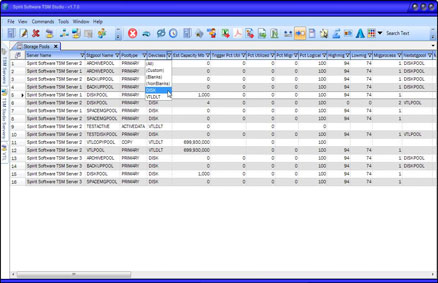

TSM Studio provides extremely powerful filtering capabilities.
At the top of each column on the right hand side where the title is displayed you will also notice a small filter icon. Click on this icon to display the filtering dialog for that column. The icon is only displayed when the mouse is positioned in the column header.
Filtering Examples
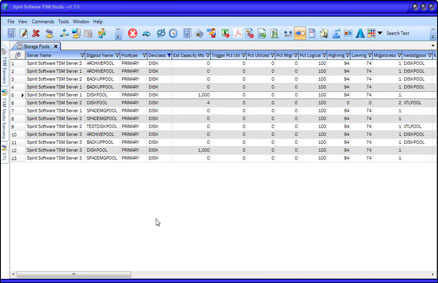
Show all rows where Devclass = ‘DISK’
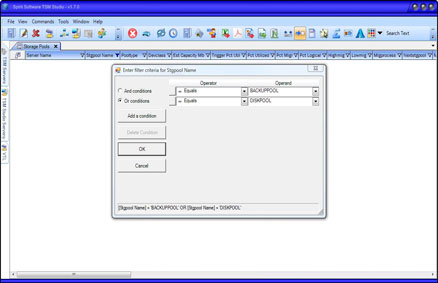
Show all Rows where Stgpool Name is either DISKPOOL or BACKUPPOOL.
TSM (10)
*** Disclaimer ***
All the articles that I have written are from my own personal experiences using TSM for the past 15+ years. TSM is a diverse product that can be setup and deployed in many ways. Before using any of the methods in the articles, ensure that you use due diligence to test that all steps will work as described in your environment.
If you have comments, like help with the contents in one of the articles or would like to see an article on a particular TSM topic please send me an email at gelliott@spiritsoftware.biz. You are welcome to use these articles on your own sites as long as you have a link on the article back to this site
Example: Written by Spirit Software Solutions
Graeme Elliott CEO,
Founder and Chief Architect
Spirit Software Solutions
All Articles are copyrighted by Spirit Software Solutions
*** LEGAL STUFF ***
Direct, incidental, consequential, indirect, or punitive damages arising out of your access to, or use of, the site and articles within. Without limiting the foregoing, everything on the site is provided to you ‘AS IS’ WITHOUT WARRANTY OF ANY KIND, EITHER EXPRESSED OR IMPLIED, INCLUDING, BUT NOT LIMITED TO, THE IMPLIED WARRANTIES OF MERCHANTABILITY, FITNESS FOR A PARTICULAR PURPOSE, OR NON INFRINGEMENT. “Please note that some jurisdictions may not allow the exclusion of implied warranties, so some of the above exclusions may not apply to you. Check your local laws for any restrictions or limitations regarding the exclusion of implied warranties.”
How can I enable VSS Snapshot support on only one windows drive
It is possible to enable VSS on a per drive basis by using the following in the dsm.opt file
INCLUDE.FS C: SNAPSHOTPROVIDER=VSS ( Change C: to the drive letter you require )
Slow Session Initiation for dsmadmc.exe
If you find that it takes upwards of 30 seconds of establish a session to the TSM Server from the Admin CLI (dsmadmc.exe). It maybe because your TSM server is unable to resolve the clients name or the TSM Server is unable to communicate with any DNS Servers.
Client Side Encryption
TSM has the ability to encrypt data at the client node before sending the data to the TSM server. There are two methods that are available
1. Transparent Encryption
- This is where the encryption key is managed by and stored on the TSM server
- If the client node needs to be rebuilt data can be easily restored
- Data can be restored back to any node that is allowed to impersonate the original node
2. Client Side Encryption
- This is where the encryption key is manually managed and stored on the client using an encryption password
- More secure as data can only be restored if the encryption password is known
- If the password is lost then the data cannot be restored
To enable encryption at the client there are two parameters for setting up and a couple of include and exclude statements for selecting or excluding which files are to be encrypted.
ENCRYPTKEY
The ENCRYPTKEY option is used to choose either transparent encryption or client-side encryption. For client-side encryption there are two options to choose from
ENCRYPTKEY=SAVE ( Client-Side )
This option will prompt for an encryption password on the initial backup and then store this password in the password file. The password will be retrieved from this file for each subsequent backup.
ENCRYPTKEY=PROMPT ( Client-Side)
This option will prompt for an encryption password for each backup and restore. To be able to restore the data the same password that was using when backing the data up will be required
ENCRYPTION=GENERATE (Transparent)
This option will have TSM generate an encryption key password which is stored on the TSM server and managed by the TSM server.
ENCRYPTIONTYPE
The ENCRYPTIONTYPE parameter selects what type of encryption is used either DES56 or AES128 with the AES128 algorithm being the stronger of the two
Next is to select which file or directories to include in the backup
use the include.encrypt statement to include files and directories to be encrypted and takes the same format as any other include statement
use the exclude.encrypt statement to exclude files and directories to be encrypted and takes the same format as any other exclude statement
example
ENCRYPTKEY=GENERATE
ENCRYPTIONTYPE=AES256
INCLUDE.ENCRYPT /home/…/
EXCLUDE.ENCRYPT /home/…/test.fil
INCLUDE.ENCRYPT C:…*
EXCLUDE.ENCRYPT C:windows…*
When using the client-side encryption the encryption passwords are stored in the TSM.PWD files in unix or in the registry for windows
I would recommended using transparent encryption unless you have a specific requirement not to.
I am option asked how to prove that the data is encrypted. There is no way to do this with TSM and they only way to do this is use a network packet tracing tool such as wireshark. If you are interested on how to do this just send me an email gelliott@spiritsoftware.biz
For more information see Chapter 5 of IBM Tivoli Storage Manager: Building a Secure Environment
How can I see what management classes my client node is using from the TSM Server
The following command will show all unique management classes used by a node
SELECT DISTINCT(CLASS_NAME) FROM BACKUPS WHERE NODE_NAME = ‘XXXXXX’
to see only management classes used on directories use
SELECT DISTINCT(CLASS_NAME) FROM BACKUPS WHERE NODE_NAME = ‘XXXXXX’ AND TYPE = ‘DIR’
to see only management classes used on files use
SELECT DISTINCT(CLASS_NAME) FROM BACKUPS WHERE NODE_NAME = ‘XXXXXX’ AND TYPE = ‘FILE’
Helpful TSM SQL Commands (29)
Show a list of unavailable volumes
SELECT * FROM VOLUMES WHERE ACCESS=’UNAVAILABLE’
Show how many debug messages have happened in the last 24 hours
SELECT COUNT(*) AS DEBUG_MESSAGE_COUINT FROM ACTLOG WHERE SEVERITY = ‘D’ AND DATE_TIME> ‘YYYY-MM-DD HH:MM‘
WHERE
YYYY = Year
MM = Month
DD = Day
HH = Hour
MM = Month
Show a list of read only volumes
SELECT * FROM VOLUMES WHERE ACCESS=’READONLY’
Show how many warning messages have happened in the last 24 hours
SELECT COUNT(*) AS WARNING_MESSAGE_COUINT FROM ACTLOG WHERE SEVERITY = ‘W’ AND DATE_TIME> ‘YYYY-MM-DD HH:MM‘
WHERE
YYYY = Year
MM = Month
DD = Day
HH = Hour
MM = Month
Show the Number of Readonly Volumes
SELECT COUNT(*) FROM VOLUMES WHERE ACCESS=’READONLY’